Introduction
Lowel lights and accessories are professional lighting products for photographic image production. They should be used with caution and care. Considerable light and heat are generated. It is important to fully read the information included in each products instruction sheet. If you have questions about the safety of use in any of our products, or need copies of instruction sheets, please contact us or an authorized Lowel dealer.
Below is a brief overview of the types of lighting fixtures, as well as their control & mounting options, that Lowel Light offers. Its is important to have at least a general idea of what you will need the lights (individually or in kits) to do. Will you be lighting large rooms, small tabletops, portraits, interviews, etc.? Consider the size of the area you are most likely to light as well as the sensitivity of the filmstock or video / digital still camera you intend to use when deciding your wattage requirements. Keep in mind that many Lowel lights can use lower wattage lamps than what's conventionally recommended. This increases versatility of use. Check the lamp chart of a specific fixture in the downloadable PDF's of the Equipment section for more information.
Required Reading
But choosing the right lighting equipment is only half the battle. The craft of lighting is an art that can be pursued for a lifetime, and even the most successful professionals are continually striving to learn more. Lowel-Light founder, Ross Lowell, set out to write a little pamphlet on lighting tips based on his years of experience in film making & photography (the same experience he called upon when inventing many Lowel lighting fixtures). That little pamphlet grew until it finally resulted in the acclaimed book , "Matters of Light & Depth". This book has something to offer any lighting professional, from novice to seasoned veteran. With thoughtful essays and lighting exercises in each chapter, it's certain to help you grow and develop your own approach to this creative art. The book is available from Lowel dealers, Amazon.com, or directly from Lowel. Click on the book cover image for more information.
Choosing a Light
Lowel lights and accessories are efficient, easy to use and dependable. Choosing the right light is first a matter of determining your specific technical and aesthetic requirements.
To help, we offer a few brief descriptions of hard & soft light, lighting fixtures, and the options for using them.
Hard light:
* produces strong\, dramatic highlights and shadows unless diffused by user.* can be used relatively far away from the subject.* generally requires fill light to soften shadows and control contrast.* brightness and spill are fairly easy to control.
Focusing hard lights:
* have beams that can be continuously varied from wide to narrow (flood to spot).* give the user control over the spread of the beam and the intensity of the light.* higher focusing ranges offer more control.

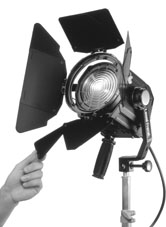
Lowel focusing hard light sources:
* Pro light: 12\, 30\, 120v; 50 to 250w.* i & id light: 12/14v; 55\,100w.* Omni: 12\, 30\, 120\, 220/240v; 100 to 500w.* DP: 120\, 220/240v; 300 to 1\,000w.* Fren-L 650: 120\, 220/240v; 300 to 650w.
High intensity (super spot) light:
* throws hard light in a very narrow beam over a long distance.
Lowel high intensity non focusing (super spot) light options:
* are available via a quick change accessory reflectors for Lowel Omni & DP lights.* are also available by using Clear Safety Glass with the Pro\, i\, & id lights.

Wide angle (broad) lights:
* are semi hard and non-focusing.* light large areas evenly.
Lowel wide angle light sources:
* V light: 120\, 220/240v; 500w.* Tota light: 120\, 220/240v; 300 to 800w.
Lowel non focusing hard light sources:
* L light: 120v; up to 300w.* Lowel light: 120v; up to 500w.
Soft light:
* consists of a relatively large\, indirect light source (ex. an overcast sky).* produces gentle\, flattering highlights and shadows.* needs to be closer to the subject.* tends to spill and reduce contrast.* requires little or no fill light.* works well as fill because it does not introduce hard shadows.

Lowel soft light sources include:
* Rifa lite: 12/14\, 30\, 120\, 220/240v; (3 sizes); 250\, 500\, 750\, & 1\,000w max. (Efficient\, quick set up)* LowelScandles: 8 lamp cluster\, 200w max total in daylight or tungsten color (Fluorescent).* Caselite: 2 or 4 lamp models\, 110 or 220w in daylight or tungsten color (Fluorescent).* Lowel Fluo-Tec studio fluorescents (various model sizes) in daylight or tungsten color.* Lowel Ego desktop digital imaging light (daylight fluorescent).
Compatibility & Versatility:
* Both Tota/Omni and ViP systems consist of focusing & wide angle hard lights that work well together in most lighting situations. All can be converted to soft sources with accessories. Tota/Omni and ViP systems share many of the same light control and mounting components.* Lowel fixtures such as the DP\, Omni\, and Pro function in multiple modes: as a focusable spot/flood light; as a high intensity super spot light (with an inexpensive accessory reflector for DP & Omni\, or clear glass with Pro\, & i); and as a soft source (with an umbrella\, or diffusion).
Controlling the Light
Lowel has a wide range of professional light control tools. To help you select and use the most appropriate ones, we offer the following suggestions:

To diffuse & soften light:
* use umbrella attached to Tota\, Omni\, V\, L light (with stand fitting)\, DP\, or Fren L 650 (with Gel brella Bracket).* use frost gel on gel frames of Tota\, V\, L light\, Pro\, i\, Omni\, Fren-L-650\, and DP.* use Diffused Glass accessory in barndoor frame of Omni or DP\, or as swing in accessory on Pro\, i\, id.* bounce light off white (color neutral) wall or ceiling.* bounce light off large\, white panel attached to a Maxa mount\, Lobo and stand.

To reduce overall brightness:
* flood a focusing light\, move the light back\, or partially close barndoors.* use full scrim in Omni\, Pro\, i\, Fren L\, or DP light.* use lower wattage lamp.* use neutral density gel on a gel frame or Frame-up.* switch off one lamp in Caselite or LowelScandles.* on camera top\, use id
Lamps shift color temperature when dimmed. Scrims and neutral density gels do not diffuse or soften, they only reduce intensity. Translucent diffusion materials do both.
To reduce brightness in some areas:
* use barndoor to shadow specific area.* use 1/2 or graduated scrim in barndoor to darken an area; rotate as needed.* use a Tota flag or black mat on a Frame up.* use Blip-set\, Fin-S\, or Hollywood Strip for finessing fine details of control.* use neutral density gel on Frame up to shade subject\, walls\, etc.* use snoot on Omni\, Pro\, i\, id\, Fren L\, DP Light.
To increase brightness:
* use maximum wattage recommended lamps.* focus toward spot position.* use super spot options with Omni Pro\, i\, id\, and DP for high intensity or long throws (area covered will be greatly reduced).* adjust mirror intensifiers on Caselite to almost double the output.* remove diffuser from front cone reflector (hard or collapsible) on LowelScandles.

To control spill:
* use barndoors or snoots\, if available.* for small lights use Tota flags on Flexi shafts attached directly to the light or to a Tota tatch\, Tota clamp\, Tota daptor\, or Flag link.* use black mats on Lowel Frame ups or Tota flags\, if barndoors do not sufficiently control spill. Note: the further from the light\, the sharper the shadow.* with Rifa add fabric Egg Crate.
To correct for daylight:

* use Blue Gel or Blue Frost Gel (which corrects and diffuses) on a gel frame or clipped directly to barndoors. Blue gels fade quickly\, if light is near spot setting. Check and replace as needed to assure consistent color.* use Dichroic filter in barndoor of Omni\, i\, id\, Pro and DP Lights.* use daylight tubes in LowelScandles\, Caselite\, Lowel Fluo Tec studio fixtures\, or Light Array.* With Rifa eX models\, swap standard supplied lamphead for accessory head to use daylight corrected High CRI fluorescent lamps.
To color the light:
* use colored gel on gel frames\, or clipped to barndoors of Softlight 2 and Light Array with Gel jawz\, or on Frame-up.* use gold reflector in Omni or DP for "warm" candlelight\, fire light\, sunset effects.* take advantage of "off color" sources (relative to photographic lights)\, such as windows\, to add blue or other color accents.
To prevent "washing-out":
In film and video, when subjects moving toward a light become too bright; moving away, too dark, try one of the following:
* use graduated or half scrim on Pro\, i\, id\, Fren L 650\, Omni or DP with screen area on the bottom of the light. Position light high enough to provide gradual shading of moving subject.* use neutral density or frost gel over bottom 1/2 of a gel frame. Can be used with Tota\, V\, Omni and DP as above.* use Variflector to reflect light\, flooding it as subject moves closer.

To provide fill light on exteriors:
* use Variflector to reflect the sun. Flood it to avoid excessive fill.* use Light flector or Tota flector for small areas.* use Omni\, i \, id\, or Pro light with 12 or 30 volt lamps\, appropriate cable and battery.* see "To correct for daylight".* to avoid the need for fill\, shoot in shaded area or when sky is overcast.
To improve camera top lighting:
* use id light for dimming with variable focus ability. (Note: lamps shift color temperature when dimmed.)* use low wattage lamps to avoid overwhelming available light.* soften with Swing in diffuser on Pro and i.

Lowel offers a wide range of components that handle a variety of mounting situations. To help you select and use the most appropriate ones, we offer the following thoughts.
To select stands:
* use Uni stand for V\, i\, and Pro lights and small accessories. Tota & Omni can also be used with some loss of stability at full height.* use Omni Stand for the above and for Tota\, Omni\, Light-flector\, and small to medium flags.* use Uni Sr. or KS Jr. Stand for the above\, plus DP\, Fren L\, Rifa 55/66 when compact packing is important.* use KS Stand for the above\, plus DP\, Fren L\, Rifa lite\, Softlight\, basic boom\, large flags\, and reflective panels.* use KSA Stand for the above when air cushioning or black "camouflage" is desirable.* use Grand Stand for heavy equipment\, booms\, Variflector\, leveling capability (especially outdoors)\, great heights and air cushioning.
To extend stands:
* use Pole or Half Pole on KS\, KSA or Grand Stand.* use Lobo & Lobo Arm\, or Missing Link & Double Male Stud or Lobo Arm for small lights.* Note: For Safety: never over extend stands\, test for stability\, use weights.

To stabilize stands:
* on grass or sand\, push Anchors through holes in legs of KS\, KSA or Grand Stand.* add Lowel Weight to struts of any Lowel stand.* use cables\, cases\, tape or whatever works.

To wheel stands:
* attach Casters to KS\, KSA and Grand Stands for heavy equipment\, booms\, etc. (casters can be locked in position).
To mount lights below stand-tops:
* use Tota clamp\, Grip and Interlink\, Lobo with Lobo Arm or Lobo with Double Male stud from Interlink.

To boom lights:
* use a KS or Grand Stand\, Grip and one or two Lowel weights as needed.* use Lobo & Lobo Arm for small lights.To clamp lights on small spans (stands, poles, etc.):
* use Tota clamp\, or Grip with Interlink.* use Missing Link with Double Male Stud or Spring loaded Stud Clamps.
To clamp lights across large spans (columns, beams, etc. up to 8 feet)
* use Space clamp (with extension bars as needed).
To mount lights on walls or windows:
* attach Tota mount with Gaffer tape for Tota\, Omni\, V\, i or Pro lights.* mount Lowel light\, or L light with mounting plate\, directly with Gaffer tape.* Note: For safety\, never tape lights to ceilings. Do not use Gaffer tape on wallpaper or painted surfaces. Rub tape thoroughly onto clean surface. Never use with heavy lights.

To mount lights on door tops:
* hang Tota mount on top of door (open or closed) for Tota\, Omni\, V\, i or Pro lights.
To mount lights on dropped ceiling grids:
* attach light-weight lights or accessories with Scissor-mount to T bar of ceiling grids. Extend and articulate with Missing Link & Double Male Stud* Note: For safety\, never use near flammable materials or automatic sprinklers; test grid for stability.
To put small lights on floors or tables:

* use Vipod with Stud link.* use Home plate with Scissor Mount.
To mount lights on top of studio sets:
* Use Screw in stud or Space clamp for small and medium sized lights.
To mount lights on video cameras:
* use Low link\, L link\, or Stud link for Pro and i/id lights.* use Cam link with any of the above for Pro and i/id lights.* use Stud link or Stud link with Cam link.
To mount large white reflector boards:
* attach foamcore\, etc. to Maxa mount with tape.* position Maxa mount with Lobo or Grip on KS stands.* use Weight on Maxa mount or stand if needed.

To float object in "limbo":
* attach prop or product to Maxa mount with tape.* slip Maxa mount through hole in seamless paper or background.* use Lobo to support Maxa mount on stand behind paper.* use counter weight on Lobo Arm if needed.
To support seamless paper and background:
* use two KS Stands\, two Grips or Interlinks\, two Full Poles.
To convert stands or clamps to "tripods":
* add Tota tilter to top of stand or clamp for emergency mounting of small still cameras and accessories.
To increase safety:
* use an adequate stand or clamp (based upon weight\, extension and conditions).* use weights on stands when appropriate.* while mounting lights overhead\, clear people from below.* test clamp and mount installations carefully. Set screw on stand fitting must be seated in undercut of stud.* use safety cables on lights attached to overhead pipes\, grids\, etc.* use ground Anchors or Weights on outdoor reflectors. Lay them down when not in use.
Choosing a Lowel Kit

For an informational overview of things to consider when buying a kit, read Kit Considerations.
Each Lowel Kit has been created from one or more of our lighting systems to offer the user a selection of lights and components at a savings over individual prices. To help you choose the best kit for your needs, review the following questions. If you have additional questions, see your Lowel dealer or call us.
What about watts?
* Total kit "wattage" does not tell the full story. Some types of lights are more efficient than others (higher foot candle readings\, or larger area coverage).* direct (hard) lights offer greater output per watt than indirect (soft) lights.* for performance data\, see charts with individual fixtures in Light Systems section.
Which is more important, speed or control?
* For fast action set-ups\, where finesse is not practical\, choose a basic kit.* Where subtlety or dramatic effects are important\, or where difficult mounting problems exist\, more elaborate kits are appropriate.

Want to customize a kit?
* Many Lowel kits have room for additional equipment: umbrellas\, flags\, clamps\, and with a few kits\, another light and stand.* Some kits come in cases with movable velcro partitions to allow maximum reorganization.* GO Kits are created without accessories\, by design\, but with room to add them as needed.* You can also order an empty case and just the equipment you need to assemble your own kit.

Need to balance daylight or conventional fluorescent light?
* Choose a kit with lots of gel frames and plan to use daylight or fluorescent correction gel filters.* Or choose a kit with lights that accept dichroic filters.* For balancing to conventional fluorescent\, consider the Light Array Kit.* For balancing to daylight fill\, consider the LowelScandles\, Caselite or Light Array Kits.
Need super-portability?