One of the first steps in any lighting setup is to decide where to place the lights. The most important light is the Key light, the main light on your subject. The second most important is the Fill light, which supports the Key light by filling in shadows that it creates on the subject. The placement of these 2 lights is the most important part of a basic lighting setup.
The angle that you light your subject from is a creative choice, depending on what suits the needs of your shot the best. To begin developing an awareness of how the position of a light can affect the look of the subject, use these image players to see the effect that different angles will give.
Key Light Position
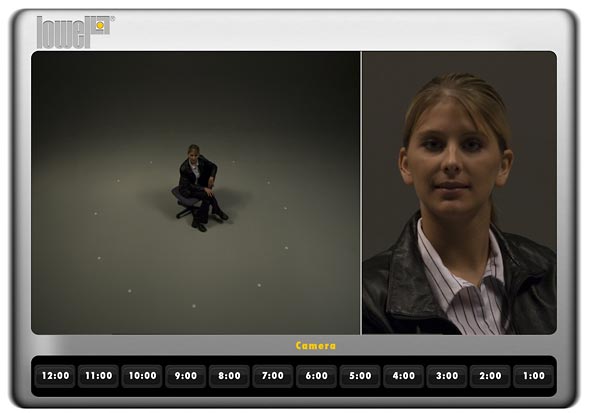
Looking at the image player you will see that the starting position for our Key light is 6:00, the same angle that the camera shooting the closeups will also be placed. Lighting from this angle will be flat and straight on, and there will be very little shadow because the light source is coming from approximately the same angle as the camera is seeing the subject. Notice the effect on the subject as the Key light moves around her. A normal position for the Key light in conventional portrait or talking head type lighting is around 5:00 or 7:00. Which side you chose to light with the Key from depends on which one looks better on the subjects face for the requirements of the shot. Lighting from this position is sometimes called the "3/4 position", since the light is clearly hitting 3/4 of the subjects face.
Some lighting angles are more flattering than others. Some angles are more dramatic with great contrast between the areas of the face that are lit and those that are not, such as the 3:00 or 9:00 positions. Some angles, such as the 12:00 position behind her, are unsuitable for most normal shots, unless you are interviewing someone in the witness protection program. Keep in mind that we also had some low level ambient light on, so you could see the positions in the wide shots. Without that added light, the contrast effects would be even more dramatic. But, as you can see, there are a number of creative possibilities that one light can offer, just based on where you position it.
Fill Light Position

Having chosen a Key light position of 5:00, it is now time to begin experimenting with the position of the Fill light. Conventionally, the Fill comes from the opposite side of the Key, since its purpose is to fill in shadows from the Key. The amount of Fill light you add is a creative decision. Use the image player to move the Fill light around, seeing the effect of its position when mixed with the Key light on the subject. Notice that a key position of 5:00 and a Fill position of 7:00 will give a very even, flat lighting. The effect becomes more dramatic when the Fill light comes from the 10:00 or 11:00 positions, which can help create a sense of separation from the background as well.
Note: The relationship of the Key to the Fill is not just based on the position of the lights, but also on their relative brightness to each other. This brightness relationship is referred to as the "Contrast Ratio". So a 2 light setup with a contrast ratio of 3/1 would mean that the Key light is 3 times as bright as the Fill light. You can quickly change the brightness of a light on the subject by moving it closer or further away. Keep in mind that this may affect spill & shadows elsewhere on your set.
Light Stand Position

We've looked at the effects of lighting from different positions circling our subject. Another variable is the stand height that you choose to light from. Conventionally, the light would be set at a position a somewhat above the eyeline of the subject, since we are most accustomed to seeing things lit from that angle in normal room light. But interesting moods can be created by experimenting with the height that you set the light stand. Notice the difference when the light is coming from a height below eye level on the subject. Lighting from chin level or below was common in old b-rated horror films, for example.
The height you choose can have ramifications, however. As the wide shot in the image player will show, the lower the height of the light, the longer the shadow it throws behind the subject. This can start to show up on the back wall and create problems. However, a light positioned at forehead height or above will often create a shadow on the jawline of the subject that can be more flattering if they have a double chin or wrinkled neck, because the shadows can help de-emphasize the problem area.